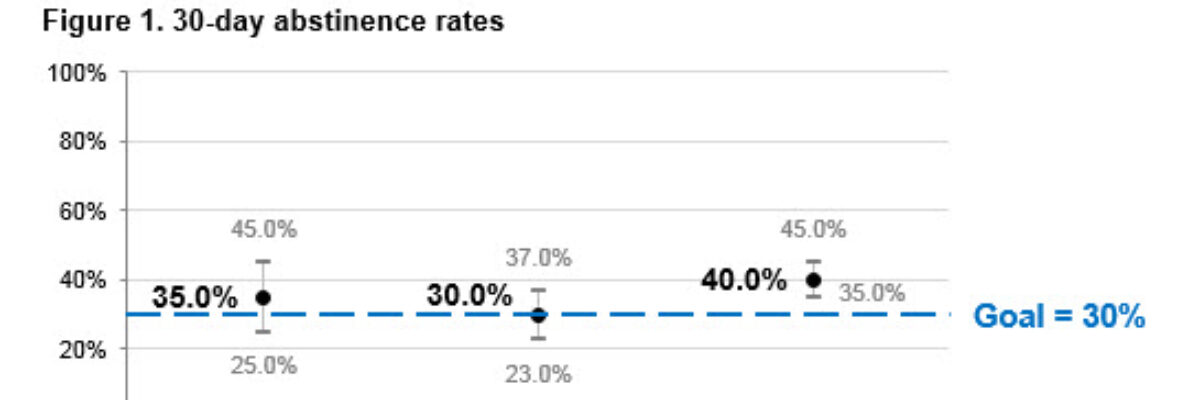
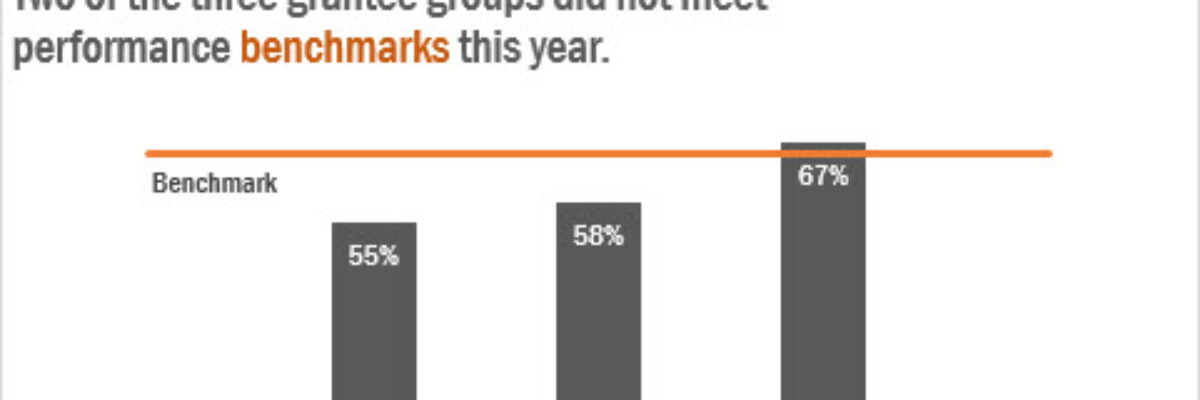
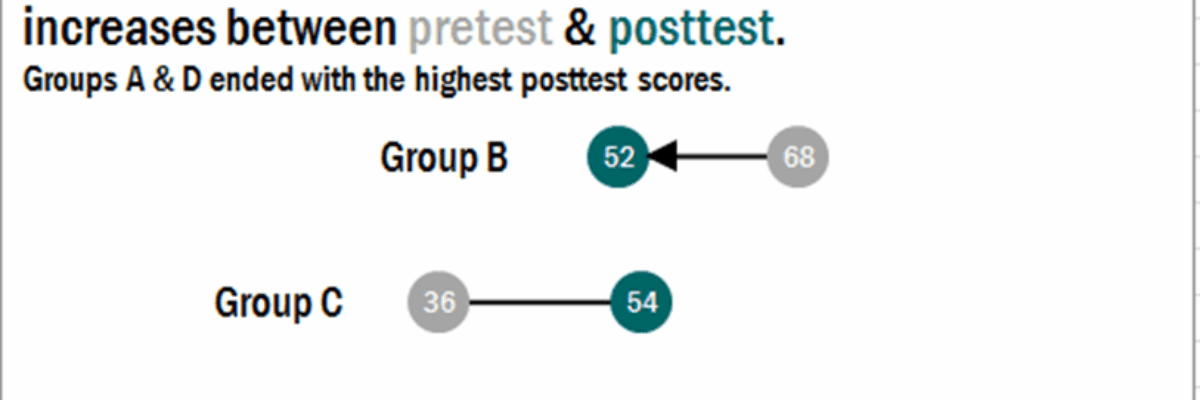
Announcing The Interactive Data Visualization Checklist

If you’ve been anywhere near the world of graph making in the past several years, at some point someone probably sent you the Data Visualization Checklist, developed first in 2014 by me and Ann Emery.

We built the checklist based on the best available research I was seeing via my dissertation work and book writing and the best practices Ann and I knew to be effective from our design work with clients worldwide. It lists out specific guidelines in five areas: text, lines, color, arrangement, and overall – on how to best format a visual so that the data story is clear, regardless of the software used to build the visual. The checklist has been used in practice by thousands of people like you – graph builders, data vizards, chart lovers – in that time.

And while Ann and I piloted the checklist with a panel of evaluators, we never had it formally tested for statistical validity or reliability. Until now.

Sena Pierce Sanjines, a PhD student at the University of Hawaii, has just finished her dissertation, studying the Data Visualization Checklist. She interviewed people like you to understand their thought processes and whether they were interpreting the checkpoints in the way that Ann and I intended when we wrote them. This is a way to test validity. She then trained raters to use the checklist to rate graphs and looked at whether their ratings were consistent – as in, whether the checklist was accurately guiding people to the right rating. This is a way to test reliability. The results of Sena’s validity and reliability testing were so stellar that we decided it was time to materialize a long-term dream:

An Interactive Data Visualization Checklist

Upload your visual and the site will walk you through each checkpoint and help you assign a rating.

If any checkpoint is unclear, we have built in illustrative examples. If any rating is unclear, we have included some helpful details so you can discern the right score.

You’ll rate all 24 checkpoints in about 5 minutes or less. At the end, you’ll see your visual’s total score, along with a list of the checkpoints where you rocked it and places where you could improve.

If you aren’t feeling all that familiar with data visualization or how to use this checklist, we also made a short training you can learn from before you get started.

And if you want to read the details on Sena’s findings, we have those technical notes for you, too.

Many people use the checklist as a guidance tool while they are developing a new visual. If that’s the case for you, download a static copy of the updated checklist.

Others use the checklist as a way to assess completed visuals or works-in-progress to see what to fix before publication. If that’s you, try the interactive version.

Training others on data visualization? Use the interactive checklist as group discussion activity.

Deciding on a company data visualization style? Run a few of your recent visuals through the interactive checklist.

Need to convince your boss that data visualization could be improved at your company? Pop one of his visuals through the interactive checklist and post a print out of the results in the break room. I’m just kidding, that could get you fired. Pop one of your own visuals through the interactive checklist and email your results to your colleagues to kickstart some honest conversation.

Guest Post – Charting Confidence Intervals

Hi there! I’m Angie Ficek and I’m a program evaluator at a small evaluation consulting firm called Professional Data Analysts, Inc. (PDA) in Minneapolis, MN. In a previous post, Stephanie wrote about adding standard deviations to a dataviz. I responded to her post with an example of how we add confidence intervals to our charts. I showed her an example of a chart from our past, before knowing anything about data viz, and our present, now that we’ve been “Evergreened.” She encouraged me to write a guest post about this, so here it goes.

PDA evaluates several states’ tobacco cessation programs. The key outcome indicator for these cessation programs is the proportion of participants who quit using tobacco, which is called their quit rate. When we report the quit rate, we include a confidence interval to account for sampling variability since we estimate the quit rate from a sample of the program participants. This shows our client the range in which their “true” quit rate likely falls. Since a quit rate is a “high stakes” outcome in tobacco control, it’s important to include the confidence interval since for any given independent sample the quit rate could vary. So…. Our quit rate charts used to look like this:

The past Ficek1 Yeah, not so clear what the most important data points are. I guess we were really into bolded fonts at some point in time. Either that or we really thought everything was important. In this example, the quit rate for Program A is 35%, which is our main data point for this program. Program A’s confidence interval ranges from 25% to 45%, but this really isn’t the point of emphasis. I didn’t like that this chart placed equal emphasis on the quit rate and confidence interval values. I saw a few other areas for improvement, so I applied tricks I’ve learned from Stephanie over the past few years.

Now our quit rate charts look more like this:

The present Ficek2 Well hey there, sexy chart! I bet it has a great personality to boot. This chart is much easier to scan and comprehend because of some important changes I made:

  1. Chart size. The original chart was sized to fit the width of a standard page in Word. Not so important. Plus, I think when combined with dark gridlines, it starts to look a bit like a musical score. Since I wasn’t interested in hearing what that tune sounded like, I made the chart a bit skinnier. I generally follow a 2:1 ratio in terms of the chart’s width and height, a tip I read about in Stephen Few’s book, Show Me the Numbers.
  2. Data values. The actual quit rate values are the main thing I want to emphasize for our clients, so I made the quit rate values stand out more than the confidence interval values by making the font a little bigger and deemphasizing the confidence interval values with a smaller, gray font.
  3. Data markers. Similarly with the data point markers, I made the black circle for the quit rates larger, and I deemphasized the markers for the confidence interval values by making them gray instead of shrieking red. Sometimes I wonder if the confidence interval marker is even needed at all though.
  4. Gridlines. I don’t usually use gridlines, but I like them in these confidence interval charts. The charts feel a little naked without them, even though I also include all of the data values. Maybe it helps me visualize any overlapping confidence intervals. I’m sure that’s the first thing my client is looking for too! Anyway, I lightened the gridlines since they’re not THAT important.
  5. Axis labels. The axis labels aren’t as important as the quit rate labels, so I first unbolded them, then made the y-axis labels smaller.
  6. Interpretation. Finally I thought, hey, a little interpretation might be helpful, yes? Great news for quit rates – a goal exists! I added in a dashed line to indicate what the goal is, and used our brand’s main color as my color of choice.  I think there’s still room for improvement in terms of how much interpretation we include in our charts and titles, but we’ll get there.

I recently met with some other staff to take this chart through the Data Visualization Checklist. Data viz geeks unite! It was a very informative exercise, and overall the chart did quite well! The biggest area for improvement, as I mentioned above, is related to including more description or interpretation in our titles and subtitles. Something to ponder for future iterations.

Great post, Angie! Have you run your graph through the Data Visualization Checklist? If so, I’d love to see what it looked like before and after you revised it. Send it to me!

Adding a Benchmark Line to a Graph

This simple line packs so much power. Adding a benchmark line to a graph gives loads of context for the viewer. Here’s how to make one right inside Excel. It’s so easy you might pass out.

My data table looks like this:TargetLine1

I have my data and I have the benchmark value listed next to each.

Highlight the group names and their data and insert a simple bar graph:TargetLine2


Then right-click on the graph and click Select Data. In that box that pops up, click the Add button to add a new series. In *that* dialogue box, select your Benchmark data. It’ll look like this, but don’t freak out:

TargetLine3Now it’s time to move that benchmark data from bars to a line.

In Excel 2013, I right-click on the orange benchmark bars and click Change Chart Type and then choose Line. You can do this in 2010, too, just click on the benchmark bars and then click the Change Chart Type button in your Layout tab and select a line graph. (This is a good time for me to mention that if I ever open a pub for data nerds, I’m going to call it The Benchmark Bar.)

TargetLine6

I also added the word “Benchmark” to the line by adding a data label to just the left most point. Of course, at first Excel tried to give me the value of the point, but just right-click on the point again and click Format Data Label and then select Series name and unselect Value.

So this is cool but if you’d like your benchmark line to be a bit longer, you can just fiddle with the data table a little and select blank cells to add some space to the set of bars and associate the benchmark 65% with each blank spot. Did that sentence make any sense? It was heavy on the nerd-speak. Just make it look like this table here:

TargetLine7

And now the graph is WAY more powerful! We’ve added so much interpretation to the data visualization, helping the viewer understand how far the first two groups are from the target and by how much Group C exceeded it. See a benchmark line in the wild in this dashboard report from Oregon Health Authority (scroll to, like, page 10). And think of other ways you could use this line, such as for targets, averages, national standard, yes keep dreaming!

This is *exactly* the kind of thing we were referring to in the Data Visualization Checklist when we said “Contextualized or comparison data are present.” Yer viewers want to be able to interpret the data – is it good? bad? the worst in history? best in the nation? A benchmark line gives that necessary context. BOOM!

This post is an excerpt from my latest book, Effective Data Visualization, where I even SIMPLIFIED these instructions. It has loads of advice on the best chart type to use and how to make it in Excel.


How to Make Horizontal Dumbbell Dot Plots in Excel

In case it wasn’t clear, I freakin love dot plots. They are amazingly easy to read, beautifully simple in their display. I was making these babies for some clients a little while ago, before and after dots for about 25 variables in one graph. And they said “Uh, hey yeah Stephanie? Could you, like, draw a tiny line between the pair of dots on each line?” >.< That was my face when I imagined painfully inserting 25 lines, perfectly aligned between the dot pairs. But I love challenges like this. Could I find a way to make Excel do this for me?

Hell yes I could.

Read below for my old instructions. I vastly simplified this process, though, and posted updated instructions here. Use this extra time you now have to go back the world a better place, eh?

Ultimately, it looked like this:

A regular dot plot is made with a basic scatterplot as its backbone. To make the dots connected, like tiny dumbbells, the backbone is just a connected scatterplot. But the construction is a little bit different. My data table is as so:

dumbbelldotplotdatatableI need a set of y values to accompany each of my x values (the stuff I really care about displaying). Note that I ordered the post scores from least to greatest. Then for the pre and post y values (columns D and E) I typed in values that were .5 apart from one another. This will force each pair of dots to appear on its own line.

So insert a connected scatterplot without selecting any data and then right-click on the empty space and click Select Data. It’ll open up this window:

dumbbelldotplotdataseriesEach pair of dots will need to become its own series. So you’ll click on Add to make a new series.

dumbbelldotplotaddseries

The little window you see above will open up. For Series name, click on the name of the group (Group B). For Series X values, select Group B’s pre and post scores. For Series Y values, select Group B’s pre y values and post y values (Columns D and E). Click OK and then repeat this for each group until they are all displayed on your graph.

It’ll look funky at first.

dumbbelldotplotfunkyYou’ll have to go in and carefully change each marker to a circle. Right-click on the markers and click Format Data Series. Up in here, select the Built-in option and choose the one that looks like a sunburst (it’s really a circle) and increase the size to 20:

dumbbelldotplotmarker

Change the color of each marker to correspond to your pretest color and your posttest color. Add the labels in the center of each dot. Finally, change the line color away from the Excel defaults. Right-click on either marker and select Format Data Point. In this window:

dumbbelldotplotlineSelect Line Style from the choices on the left and adjust the width of the line (I ended up using 2 pt). Select Line Color and pick gray or black or something unassuming.

I thought we were good to go but my clients said they’d prefer if we brought better attention to the places where the scores actually decreased. While it would appear that one could simply change the line style in the window shown above such that it began or ended with an arrowhead, in actuality the arrowhead is obscured by this awesome size 20 dot. So I manually inserted a tiny triangle, which wasn’t too painful, especially since we only applied it to a small portion of the dumbbell dot plot pairs.

Add in a sweet title and some textboxes with labels and now we are talking about one heavy-lifting data visualization. Check out a recent report by OHA that uses dumbbell dot plots (I consulted on the design).

AND FOLKS! This is a great example of choosing a graph type that is appropriate to the data. Dot plots are awesome for showing comparisons between two (or sometimes more) points. This would score a 2 on the Data Visualization Checklist item “The type of graph is appropriate for data.” 

This is a very early draft of a section now in my latest book, Effective Data Visualization. It has loads of advice on the best chart type to use and how to make it in Excel. Video help is available at the Academy and in The Evergreen Data Certification Program.


Labels are Used Sparingly

This post is about how to avoid inducing claustrophobia in your data visualizations. Too much text on a graph clutters it up, making readers feel suffocated. So let’s address the checklist item Labels are used sparingly.

Sometimes, too much text isn’t the issue. Take a look at this scatterplot, produced with Excel’s default Insert Chart option. It uses data from Radical Math and plots the percent of people of color living in each NYC area against the number of military recruits per 100,000 in those same areas. This version would score zero points because there is no intentional use of labels.

Here is an improvement:

ScatterplotLabelsBetter

This version would score 1 point. Why? I decluttered the graph a little by removing every other number from the y-axis and shifting the correlation notation from inside the graph to the subtitle. I also added in axis labels for clarification, better orienting the reader to the data at hand. (I altered the title and subtitle too, which I discuss in another post.)

But we could take this even one step further, for a full 2 points:

If we labeled every data point in this scatterplot, it would be impossible to read. But one of the first questions readers will have about the data is which NYC areas are outliers and which are on the trendline. So we can sparingly label selected data points to provide some context. For example, there’s little surprise that Rikers Island would have no military recruits, since it is mainly comprised of a jail. Of course, if this scatterplot was interactive, hovering a mouse over a dot or tapping it would reveal the name instead.

Bottom line: Use labels sparingly to simplify what you can and then emphasize key points to tell the story.

Check out my other posts related to the Data Visualization Checklist. And go see what Ann Emery has been publishing on the checklist, too!

How to Rock the Text in your Data Visualization

Very recently, Ann Emery and I released the Data Visualization Checklist. It’s thorough and its going to help your data visualization kick some serious ass. In these subsequent posts on each of our blogs, Ann and I will illustrate some of the checklist items to show how a graph can progress from 0 to 2 points.

Today we tackle a graph’s title, subtitle, and annotation, the first two items on the checklist. These babies are a big deal, folks. Why? Because data visualizations typically don’t get all that much text. It’s supposed to be a visual, after all. Which means there’s a ton of power packed into these short bits of text we have to work with.

Most commonly, we don’t take advantage of this power, however. Usually we see zero point graphs that look like this: ChartTitleBeforeWhy do we do this to our readers? They are looking at our graphs because they want to know what we think about student volunteering and leadership but we are refusing to tell them what we think. We probably do this because when we create a graph in Excel, it produces a two-word Chart Title placeholder and we are subconsciously urged to be similarly obtuse and generic. Zero points, yo.

This version would get one point for the title checklist item and two points for the subtitle checklist item: ChartTitlePartialIts improved in that the chart title is in the upper left, where our eyes (in Western culture) would want to begin reading. I also added a subtitle, which gives some helpful information and allows the reader to draw some conclusions about (at least part) of the data.

Even better? This one: ChartTitleAfterTwo more adjustments bring this graph to full points for the first two items on the data visualization checklist: 1) Making the title a declarative sentence. Its adds interpretive power for the reader, who would otherwise think “Cool graph, dog, but does this mean we are good or bad or what?” This way the reader understands the graph’s main takeaway point. Things are looking good. 2) An annotation under the first bar. This additional point brings massive action-oriented support to the graph. If 97% of close friends volunteered, but only 74% of survey-takers volunteered, the annotation draws attention to an opportunity that this fictitious nonprofit can build into it’s next strategic plan.

And that’s how you leverage the little bits of text in a graph to make it a powerful tool for decision-makers.

Ann and I are posting examples of charts that do and do not meet the checklist points. Check them out if you need an illustration.

Ann’s post today shows how to fully score a graph using the checklist, particularly focusing on text direction.

Did you remake a chart based on the checklist? If so, I’d LOVE to see it. Email me